Website Migration Checklist: Your All-in-One Guide
Website migration is one of the most time consuming and tedious processes you have to do. There are many things which you need to take into consideration. We know how much frustration it may cause and that’s the reason we have selected this ultimate website migration checklist.
This is the complete beginner’s friendly checklist. We will first see all the things that you need to take care of while migrating your website. Thereafter, we will see each step in-depth. This will give you a clear idea about what is need while migrating the website.
Website Migration Checklist
We will first see the checklist where we will see the points you need to take into consideration.
- Backup of your current website
- Choosing the best time to migrate your website
- The tool you can use
- Setting up Domain and hosting
- Copying files to the new host
- Copy the database
- Updating the DNS
- Testing the website
- Submitting the website to Google
Now, this is the quick checklist that you can check.
Let’s talk more about it. There are many ways you can migrate your website.
- One is where you can migrate the website using a tool
- The second is where you can do it manually
- The last one is where you also want to change the domain.
The checklist is different for all three things.
We will see the detailed checklist of three things. Before that, there are two main things to keep in mind before you start the migration process.
Find the Best Time: You can’t simply migrate the website anytime. You need to choose a date and time when you have got the least number of visitors on your website. So, even if your website goes down, it doesn’t affect your website.
Choosing a type: The next thing is to choose which way you want to transfer the website. We already saw the three ways to do it, you need to select one from it.
We have divided all three ways into three parts to make your work easier. Don’t forget to check out the last phase of testing and reviewing which is common for all.
Checklist 1: Migrating via Tool
You can easily migrate the WordPress website via the tool. Here is the website migration checklist you need to follow if you are migrating using a tool.
Backup your Website
The first thing you need to do is take the backup of your website. It is highly recommended to store the backup in your local machine or cloud storage.
Make sure you have a proper backup of the following things.
- All the files of your website
- Database
- Emails
There are various WordPress migration plugins that can do this job.
But in this guide, we are going to use All in One WP Migration plugin to take the backup of your files and database. In case you run with any issues during this process, you can always use this helpful guide to get you through this step.
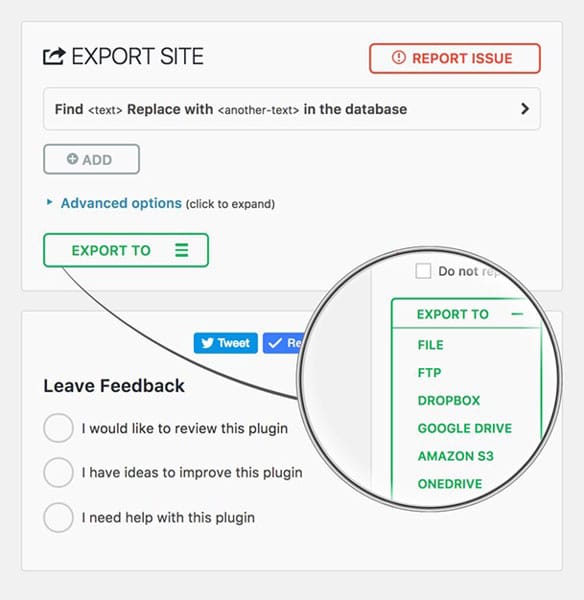
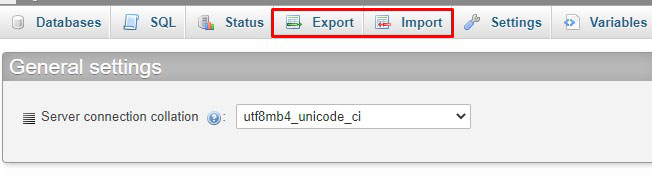
Next, after you install the plugin from the WordPress directory. Head over to All in One WP Migration > Export.
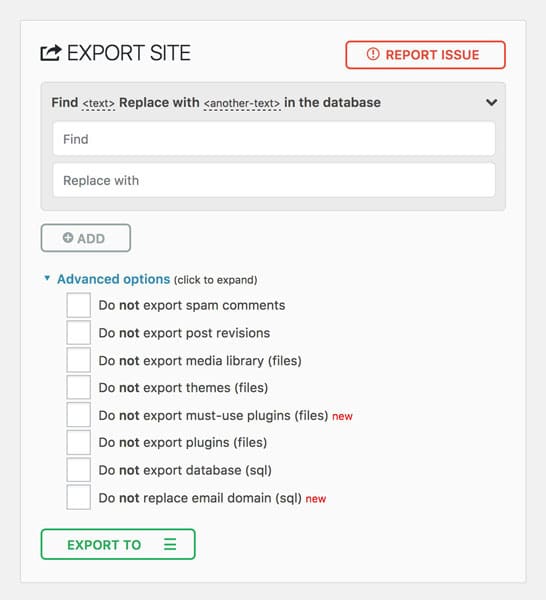
You can replace a word or string if you want. Else, you can simply click on the Export button. It will also ask you where you want to send the data. You can download it as a file or you can also send it the Cloud Storage.
Don’t forget to backup the emails too. You can right-click on the Inbox folder and click Export.
Set up a new Domain
If you have multi-domain hosting, you will first have to add your domain name to your host. To do that, you can click on “addon domains” in your cPanel. Enter your domain name and that’s it. A directory with your website name will be created for you.
You also need to point the nameservers to the hosting or else it won’t be possible to add the domain name directly.
So, let’s change the nameserver now.
To change the nameserver, you can first open your domain registrar. Now, you need to change the nameserver.
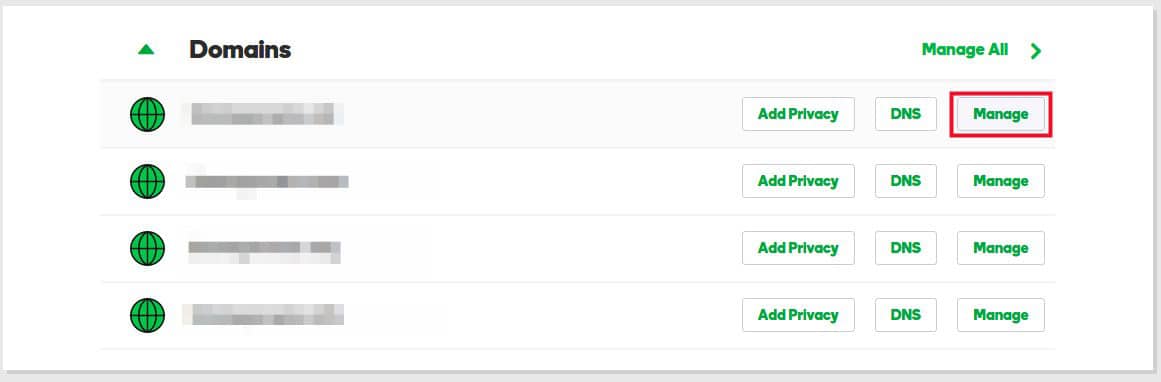
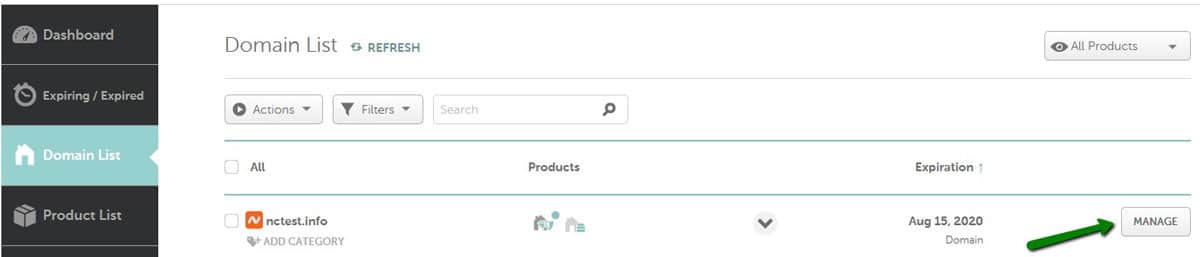
For Godaddy users
Go to the “Manage” button in your domain list.
Now, head over to manage DNS.

Change the nameserver to the respected hosting account.
You can contact your hosting provider to get the nameserver or you can also check your email (they usually send it).
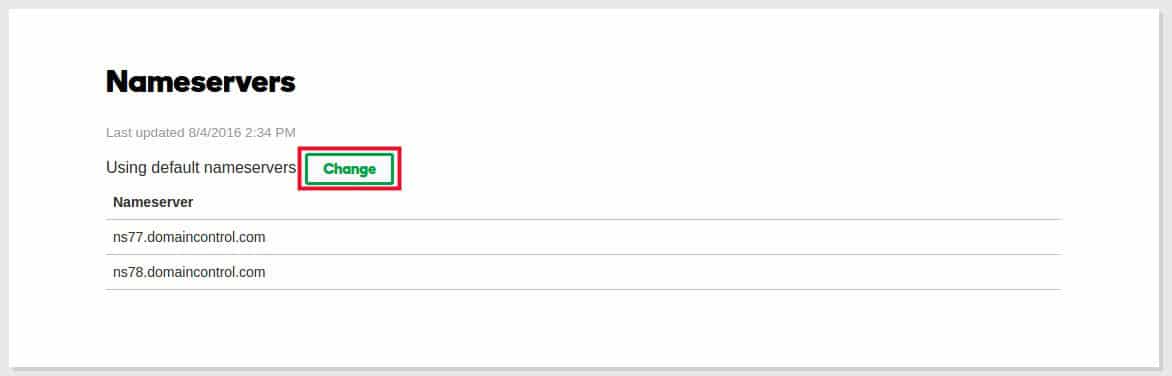
For Namecheap users
Click on the “Manage” button beside your domain.
Scroll a little bit and you will find the nameserver options.
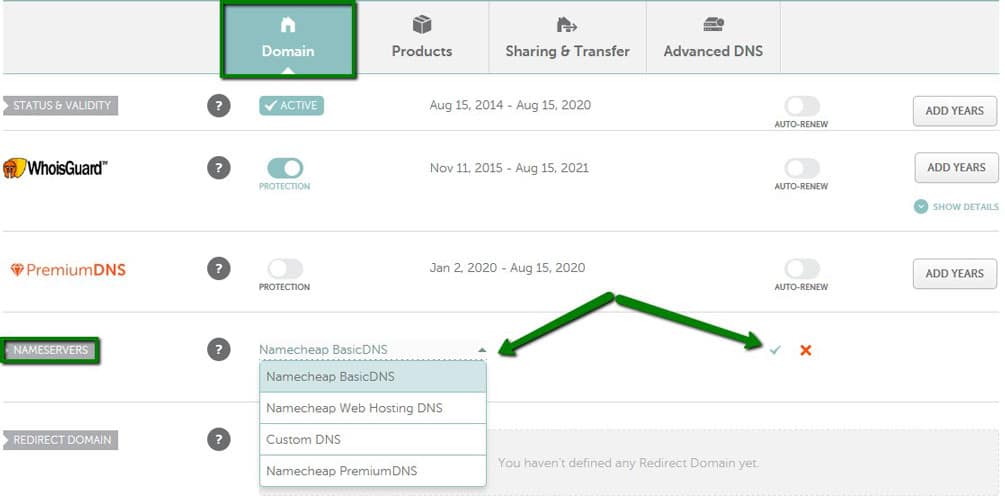
You can change the nameservers from here. Select custom nameserver from the dropdown and enter the nameserver given by your hosting provider.
The DNS might take up to 48 hours to update. Make sure you don’t delete the website from the old host.
Install WordPress in the New Host
We will now install WordPress in the new host. You can head over to Softaculous and install WordPress like usual.
Install the All in One WP Migration plugin that we saw earlier.
When you activate the plugin, you can move to All In One WP Migration > Import.
You can either upload the files directly or import them from one of the cloud storage.
Just click on the import button and that’s it. You can now relax and wait for a couple of minutes for the process to finish.
Once the process is finished, you can check the website and see if it is working properly or not. Make sure you check all the pages of the website to be sure about it.
Import your Emails
You can import your emails easily by going to the Email accounts in the cPanel. There are all the options given to import the emails. Or in the case of a few hosting providers, if you are considering using their third party email service like Microsoft Office 365 with HostGator or BlueHost, you might want to check this review first. It is self-explanatory.
Checklist 2: Migrating Website Manually
This might be a little hard thing to do. However, you can surely migrate your website manually. We will see how to do it here. Make sure you follow all these points if you are migrating the website manually.
Backup your Files/DB
You will have to take the backup from the cPanel instead of taking it with the WordPress plugin.
To take it from cPanel, you can simply create a zip of your website directory. Right-click on the website directory and click on the Compress button. Download the backup and that’s it.
In the same way, head over to PhpMyAdmin and choose the WordPress database. Go to Options > Export.
That’s pretty much it. Now, you have the backup of your files and database. Do the same thing with the emails.
Add a new Domain
You will have to add a new domain to your hosting account before we can copy the files. We won’t repeat all the steps here again. You can check out the previous section for a step by step guide.
Here is a short overview of how to do it.
- Open your Domain Registrar
- Click on manage
- You will see the option to change the nameserver or DNS somewhere.
- Change the nameserver to your current host’s nameserver
- You can get the DNS information directly from the hosting provider
Once it is done, you come to cPanel in your current host and click on the “Addon Domain”. Enter the domain name and click on the Save button.
Upload the Files
Your next task is to upload the files. We already have the backup of the files. We will have to upload it here.
Open your file manager and head over to the website directory. You can then open the website directory and click on the upload button. Select the zip and upload it there. Don’t forget to extract the zip before continuing.
Create the Database
We already have a domain name in your hosting along with all the files. However, we don’t have the database yet. So, we will have to create a database here.
Now, you need to head over to MySQL Database and create a new database. You will find the option in the cPanel itself.
You can click on the “Create new database” and type the name you want.
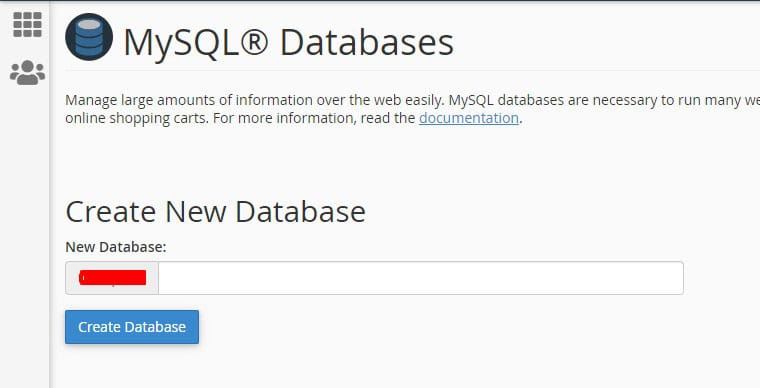
Make sure the name is easy to identify. You can keep your website’s initials.
Once you are there, you can head over to MySql Users and create a new user. You can give a username and password to your new user.
Assign the user to the database. You can find the option by scrolling a bit.
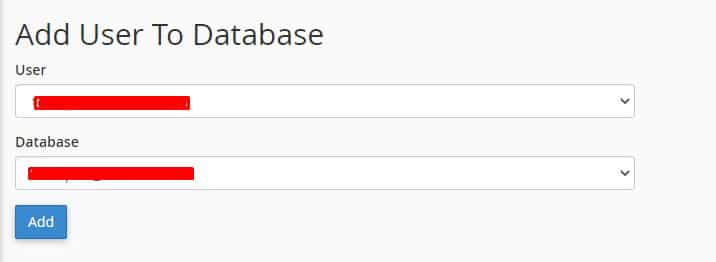
Make sure you give them all the privilege to access and edit the database.
Just select all and hit the save button.
Upload the Database
We just created the database, we have not uploaded the old database on the website. So, we will do it here.
It is not possible to upload the database via the MySQL option. To upload the database, we will go to PHPMyAdmin.
It will show various databases inside it, select your database. Click on the import button and select the SQL file that we took the backup of.
Upload the SQL file and that’s it.
Configure the Website
Don’t hurry to open the website as it will not open. We will have to configure the website’s file. Right now, it is still getting the database from the old database. So, we will have to change the database information.
Head over to File Manager and open your Website directory. You can look for the wp-config.php file inside it.
Once you find it, you can right-click on it and click “Code Edit”. The code edit button will allow you to make the changes in your file.
Now, you need to look for three things. Database name, database username, and password. Change all three things to the details you entered before.
Click on the Save changes button on the top right corner.
That’s it, you can now visit the website. You will see that website is working fine without any issues. Sometimes, it takes more time for DNS propagation, you can wait.
Don’t forget to import all your emails.
Checklist 3: Changing the Domain Name
One of the toughest things to do is change the domain name of your website. This website migration checklist also consists of this part where we will see how you can change the domain. Make sure you keep these things into consideration when changing the domain on the WordPress website.
Connect the Domain and Hosting
Of course, you will have to connect the domain name and hosting before we do any of the things. You can do it by the above steps that we discussed.
Make sure the domain is pointing to the hosting. You can either use the new hosting or the current one, it doesn’t matter.
Change the Domain From WordPress
Now, we will change the domain name from WordPress.
To do it, we will go to Settings > General. You will see the site URL option there. Change the URL to the new domain and click on save changes.
Your website will not load after that. Don’t worry and follow the next step.
Do the Migration
You can now migrate. Follow the same steps that we discussed in the manual migration part.
You need to follow the same steps that we discussed earlier. Thereafter, you can move on to the next part.
Install Real-Time Find and Replace Plugin
Your website will be working by now. You can install the “Real-time Find and Replace” plugin. Install and activate the plugin.
This plugin will replace all the text in the database with one click. We will need it because there will be many links that are still pointing to the old domain name.
You can change it via this plugin.
Enter the old domain name in the find filed and enter the new domain name in the replace field.
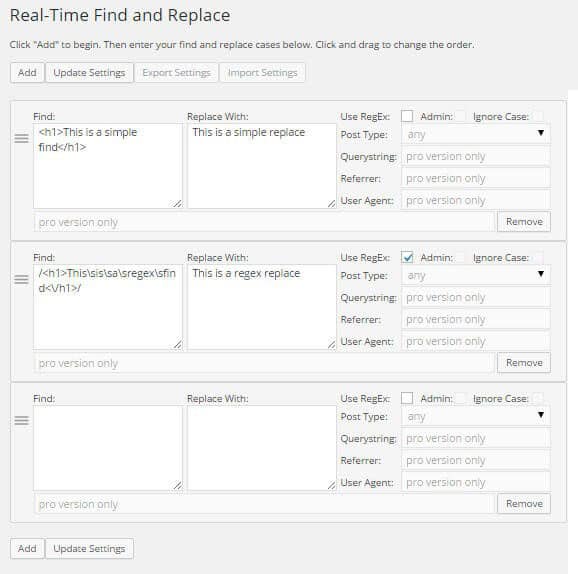
Click on search and it will replace all the instances where the old domain name is used. This is something that you should surely do especially if you have a lot of internal links.
Do it via Plugin (Premium)
Many plugins allow you to migrate the domain name. It makes your work easy but the plugins are paid. So, if you are ready to invest some money in the plugin, you can buy one and do it.
The steps are pretty much simple. You can see the documentation of the plugin for more.
You surely might be thinking about the plugin that you can use. So, here are some of the best plugins that you can use to change the domain name.
- Duplicator Pro
- UpdraftPlus Premium
You can use any of these plugins as per your choice. In most cases, a manual transfer is the best option. Don’t forget to check the website after you make all the changes. That brings us to the last point of the website migration checklist – testing the website.
Google Search Console
You need to tell Google about the changes, right? This is only applicable if you have changed your domain name.
You can open the Google Search Console and there is an option to submit an update. Tell Google about the changes as soon as possible.
It might take a few days for Google to make the changes. Once the changes are made, you are all set.
Announce the Good News
Now, you can announce the good news to your subscribers. So, they stop visiting the old domain name and visit the new domain name.
Further, you can also change your domain in your social media handles.
Don’t forget to change it in all the directories where you have an active account. Further, you can also try emailing the website owners to change the backlinks.
Don’t Cancel the Old Domain
If you have changed your domain name, here is a nice tip for you. Don’t change the old domain name. Instead, you can redirect it to the current one.
In this way, none of your visitors will be lost and you can also keep the old branding for yourself. You can also display a 5-second message saying the domain was changed.
Finalizing the Changes (Testing and Troubleshooting)
Before you get out of the desk, you need to check a couple of things. This also can be considered a part of the website migration checklist.
The first thing you need to do is test your website.
Biggest mistake of people: They only check the homepage.
You need to check all the categories pages, archive pages, posts, and main pages. This will give you a clear idea about whether your website is working or not.
If some of the links are not opening, you can follow these simple steps to fix them.
- Open wp-admin and go to the Settings > Permalinks
- Don’t do anything. Just click on the save button
- Check the website again
In most cases, the website will be working again. This is because of the corrupted .htaccess file. You can fix it with the given steps.
Final Words
To conclude, this was the website migration checklist that you should follow. It was a checklist as well as a complete tutorial on how to migrate your WordPress website. We saw all the possible ways to do so.
Now, whenever you are transferring a website, don’t forget any of these steps. It works as a checklist and a complete guide.
![]() Sonal S Sinha is a regular blogger for WordPress and WooCommerce. He comes with a rich experience of 15+ years in WordPress ecosystem. He writes and shares insights related to website design, digital marketing and WordPress related topics. Check out the free WordPress themes launched by him and his team at SKT Themes.
Sonal S Sinha is a regular blogger for WordPress and WooCommerce. He comes with a rich experience of 15+ years in WordPress ecosystem. He writes and shares insights related to website design, digital marketing and WordPress related topics. Check out the free WordPress themes launched by him and his team at SKT Themes.
You can follow him on Twitter or LinkedIn.
